Quenching: Rapid Cooling

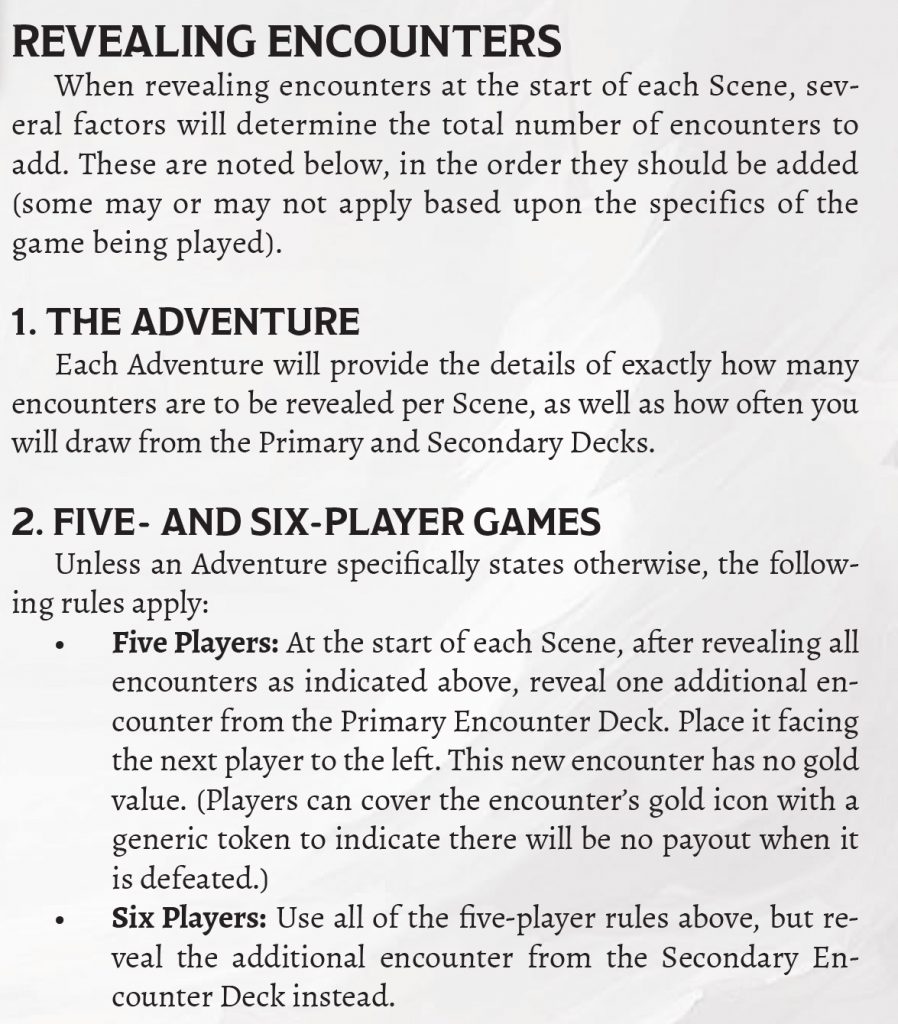
We’re approaching the end of the process for designing encounters. But at this stage, we’re actually more focused on the encounter deck as a whole, not any individual card. Hopefully it’s already been made clear that the Encounter Decks are designed to work as a set. But more so than at any other stage, this is about setting the strength and cohesiveness of a deck for game play.

One of the ubiquitous movie scenes surrounding the forging of a blade is the quenching. When the blacksmith takes the heated blade and plunges it into liquid with a wonderfully satisfying spray of bubbles and erupting steam. Very evocative. More importantly, it’s a crucial element. A transformative moment for strengthening and hardening the blade.

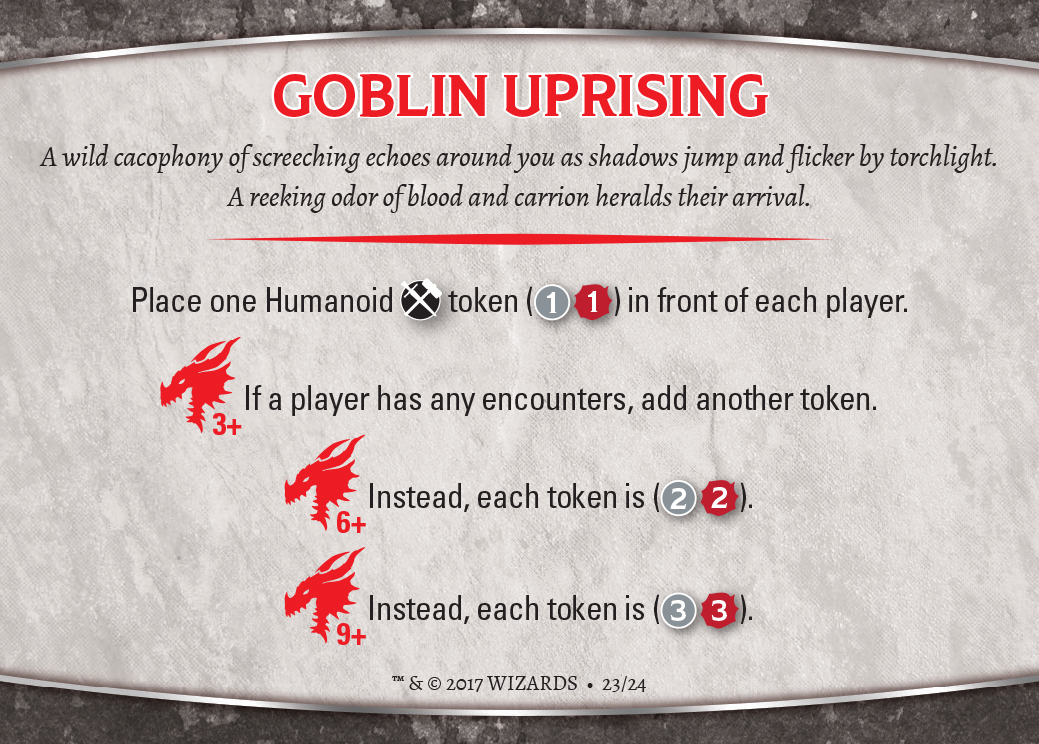
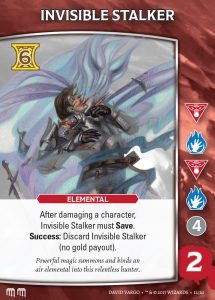
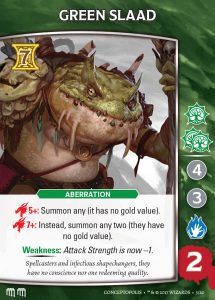
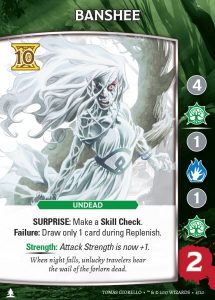
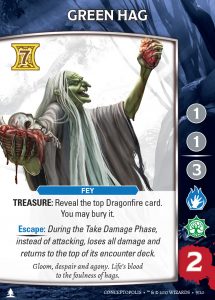
Location encounters are that quenching process that most readily brings out the strength of a given Encounter Deck. That being said, I don’t believe there’s an element of Dragonfire that has caused more arguments and more contention. At the same time, even outside of the crucial design element that adds the hard into the puzzle that must be solved to win the game, they also bring a fantastic Creative aspect to any game table. After all, is there anything more quintessential to D&D—or almost any good story—than to separate the party or to place yet another obstacle in their path? The appearance of a Choke Point or Cursed Ground can throw all of your carefully laid plans out the window as the crucial Lightning Bolt you needed from the wizard or that Cure Wounds needed from the cleric are now off in a completely separate Location, away from the main party.

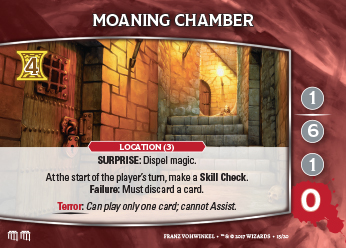
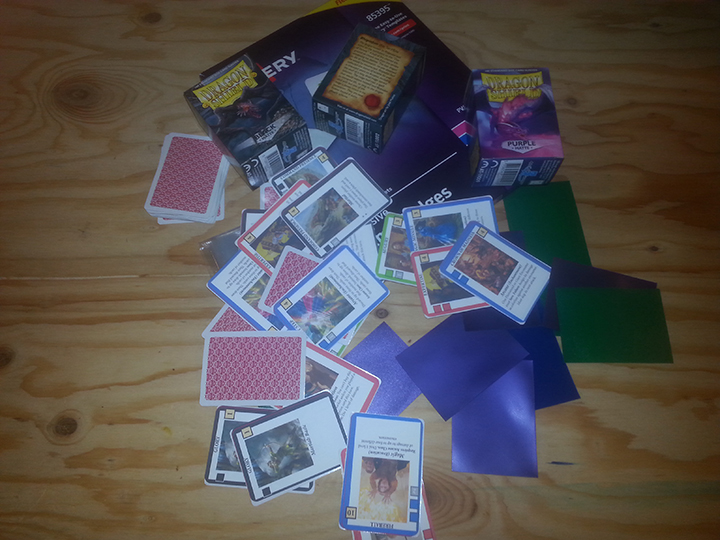
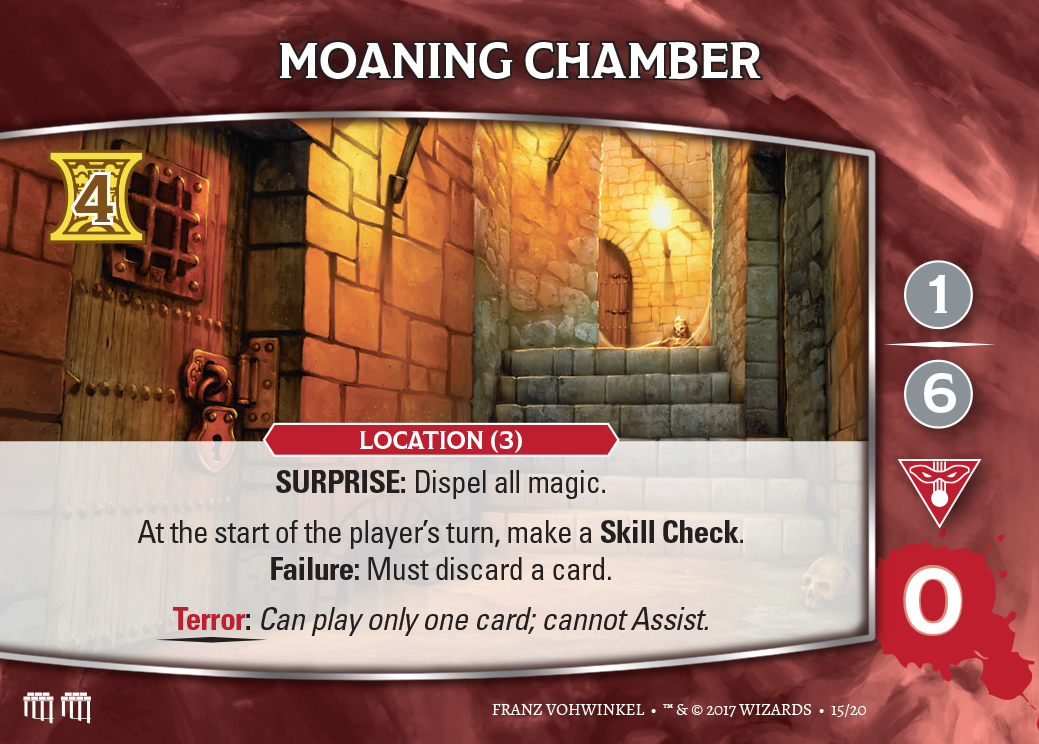
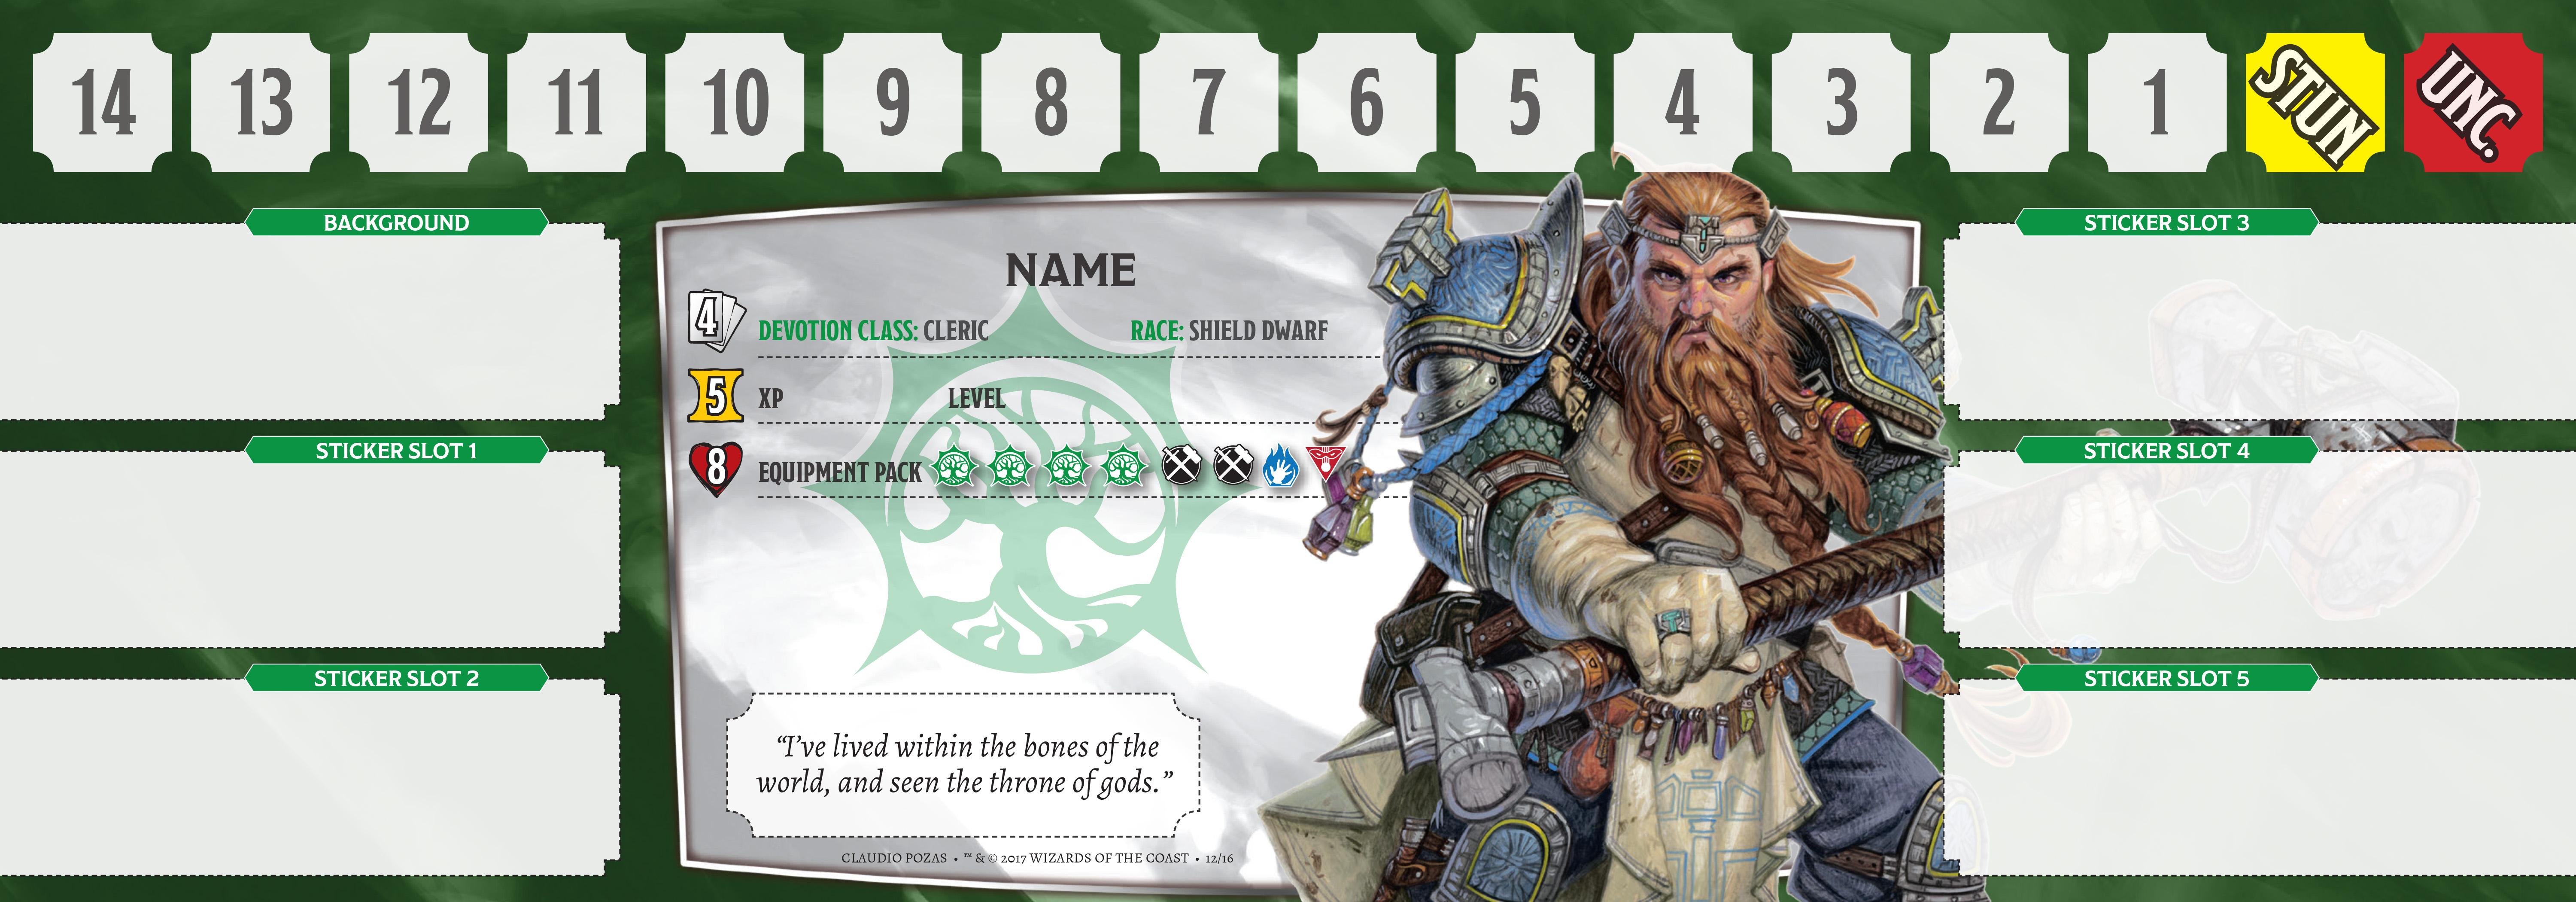
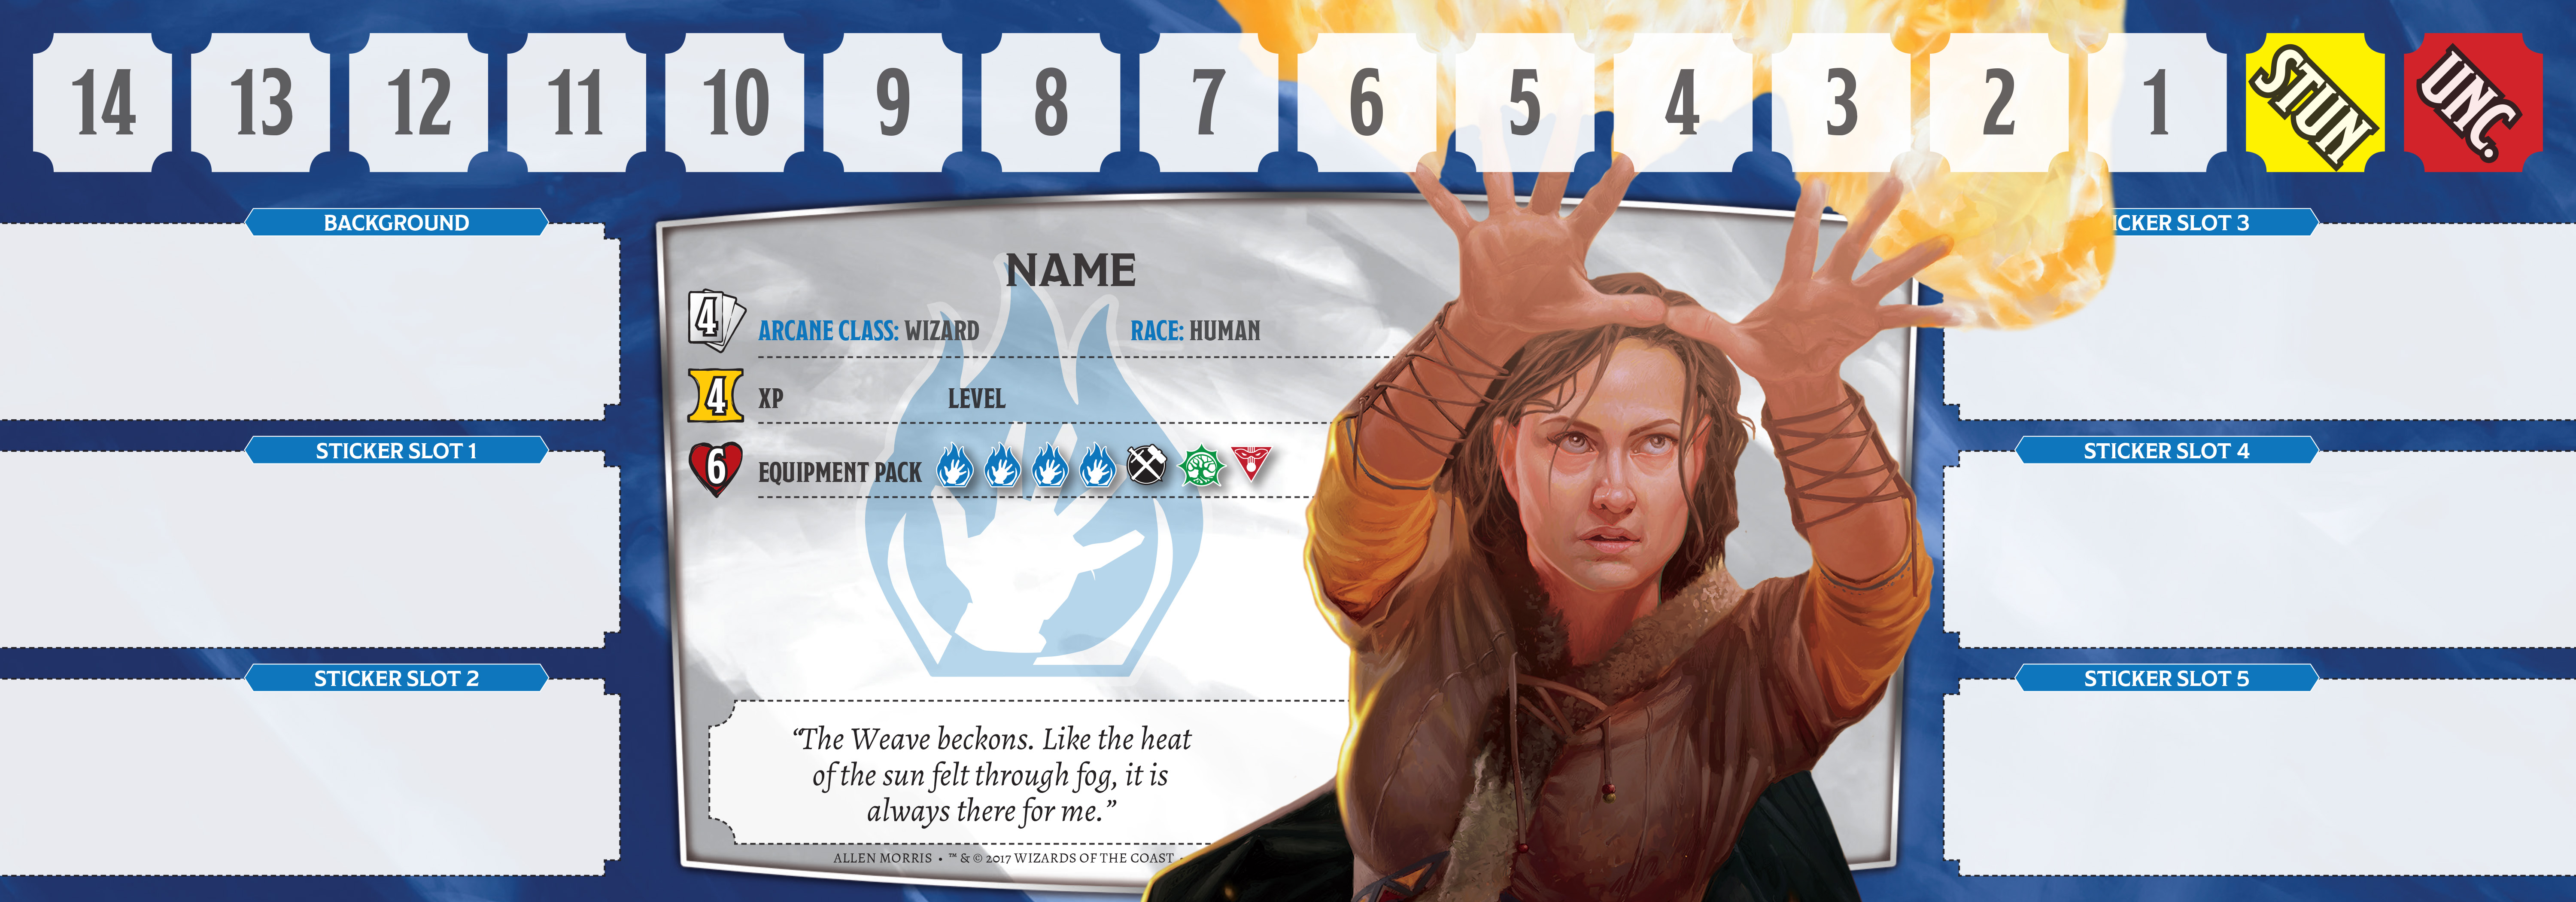
Location encounters are seeded into the deck; in the base box set, its usually two per deck. So as you’re revealing encounters throughout the game, you have no idea one is coming until its revealed and placed in front of a player. Once that Moaning Chamber is placed into play, you’re plunged off into another dangerous portion of the adventure. You’ll take your Class Type marker and move it from the Adventure Environment card (where all player markers start the game) onto your Location to visually show that you’re separated from the party.

The reason this can be so dangerous and is one of the key difficult elements to the puzzle of any given game is now there’s several elements working against the party.

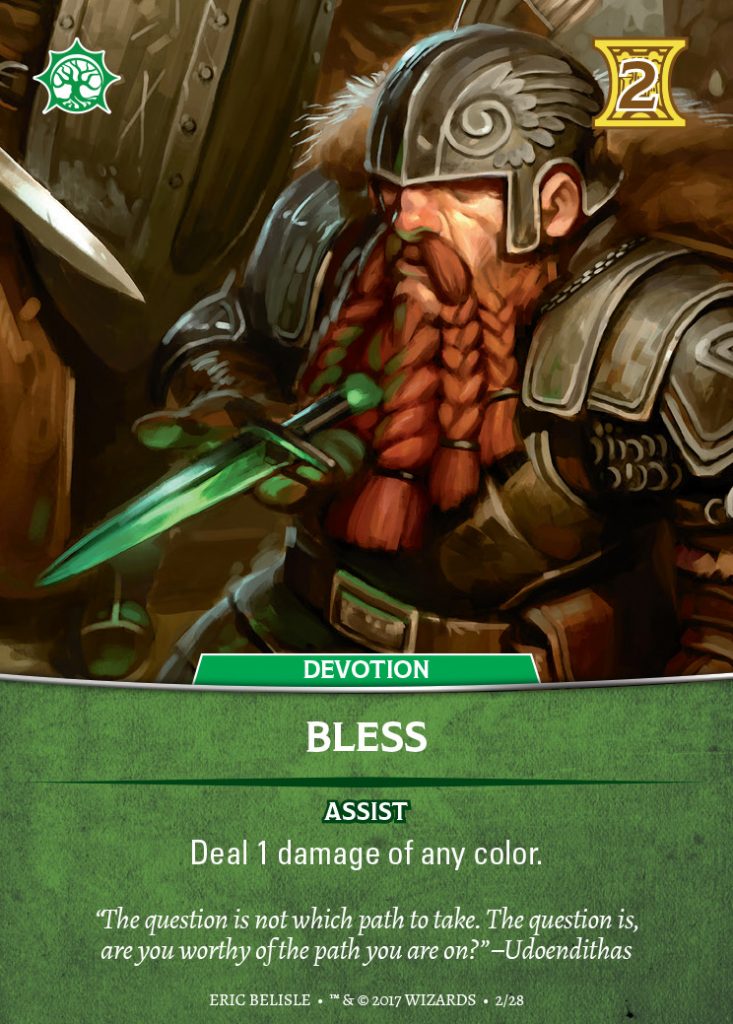
First, normally you can play the damage from your cards against any encounters on the table. It’s a cooperative game, after all. Now, however, you can only play Assists into or out of a Location. In other words, if you’re inside the Location, you can only damage other encounters with Assists. And if you’re not in that Location and are trying to damage it or an encounter inside it to help the separated player…once again, only an Assist will do the job. And Assists are not very plentiful.

Second, another player could jump in if they wish to help you; as noted above, if they’re in the Location with you, they can play cards against the encounters facing you as normal. However, several issues with that. Primarily, there are specific limitations to how many players can be in a Location at once. Cursed Ground is wide open. However, if you check out Choke Point, the number in parenthesis is that limitation, so in this case, only two players can be in that Location. And once a Location is in play, there must always be a player in it until it is defeated. So you can move out of a Location if you’re the Wizard with the lowest hit points. But someone always must be in that Location. So you have to take the initial hit, wait for someone to jump in the hole with you and then move out on your next turn. And speaking of that hit, you could be facing both a Location as well as several other non-Location encounters. And they’re all attacking every turn!

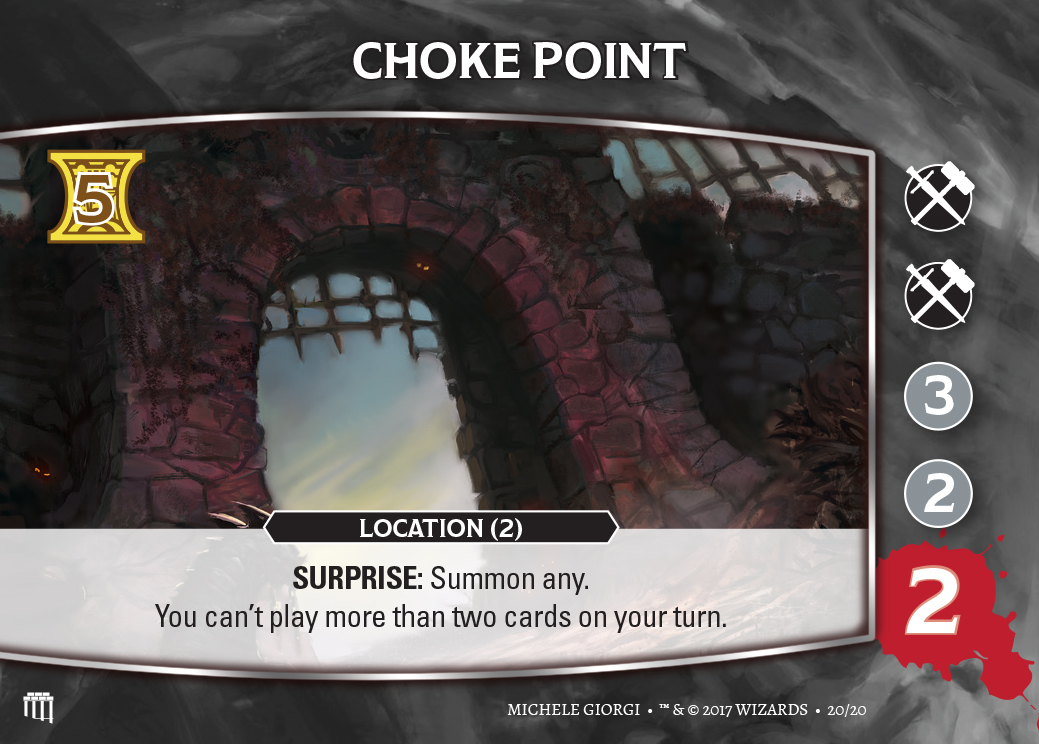
Third, even outside of those player limitations and the extra attacks, the Locations often bring extra intense rules you have to deal with. For example, that Cursed Ground forces you to discard two cards the moment it is revealed…which is pretty brutal. And then Choke Point does exactly that…chokes off your ability to play a larger number of cards, making it so much more difficult to defeat the Location. And then you’ve got the Moaning Chamber, which I’ve previously shown. It doesn’t damage you…but it can separate you for a round or three, which weakens the whole party.

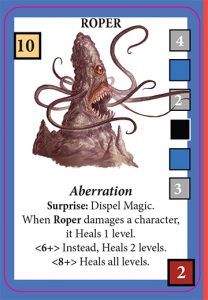
(For those paying attention, you’ll notice that the last level of the Moaning Chamber changed from a colorless 1 to a Deception icon since I previously showcased the card. Loren, Jay, and I have spent many, many hours over the last three days carefully reviewing every last element, card and sticker of the game, making any last tweaks we feel are appropriate, and that was one of them. And in fact, they were here earlier in the day for another several hours to get through the last of the review.)

At this stage you might be asking yourself, “Why did that cause a lot of arguments? That all seems great!” Despite the relative ease of understanding it once you play it, it’s the initial understanding of the concept that has proven a beast to effectively communicate. I don’t believe any portion of the rules received more attention. I rewrote its presentation at least a half-dozen times, and then it was re-written by one editor and then re-written twice by another editor, simply trying to find the best, most concise way to present the rules. And because of that potential complexity, we wondered if we shouldn’t even include it in the base game, and push it to a future expansion instead.

Ultimately, we decided it was too important to both the Creative as well as the design we wished to present. As you dive into the game in a few months, even if you stumble a little through how Locations work, we hope you stick it out. It really is one of the best parts of the game. As with any good story, when one of your party is abruptly separated, you may think there is no hope. But you dig deeper, search more carefully, and fight harder and smarter, you’ll most often come out the other end with a victory. And it’s all the more powerfully sweet for that extra danger you faced and conquered.

Until next time!

Randall

Impending Doom

Right about now, I thought I’d take another brief sidetrack away from encounters to discuss one of the single best aspects of Dragonfire: the Dragonfire Deck. (Utterly apropos, as it can so often turn encounter cards from manageable monsters into raging creatures of destruction.)

This deck represents the sound of orc drums in the cavern depths, the clatter of hoofs on cobblestone in pursuit, the spidery claws grasping at your cloak in the tangled wood. It is the driving pressure that keeps the game exciting and grows ever more dangerous the longer you take. At any moment, the orcs might appear, the horse might heave into view, or the claws might snap the cloak tight against your throat.

In terms of how this plays out at the table, once the game is set-up, the last thing you do before the first person (the Party leader) starts their turn is to reveal a Dragonfire card, read it aloud, and then place it on top of the Dragonfire Deck.

Each includes a bit of flavor text that helps to set the scene of what’s unfolding in that given round of the game. Then the rules text, as appropriate, is applied. Sometimes it can be rather innocuous, such as the Homunculus At Play. Sure, it can be annoying to discard a card, but you get a gold, so all things being equal, not a bad trade.

You can also have very situational Dragonfire cards, such as Magical Surge. If there happens to be no blue encounters active, and you’re below Dragonfire level 4, then no real worries. You’ve got a round without dealing with additional Dragonfire effects.

However, you have some cards that are always a pain and are a troll-kick-in-the teeth when they show up, such as A Master’s Hand.

And of course, you’ll note on both A Master’s Hand and Magical Surge that there’s a Dragonfire level to deal with; the dragon head icon, with a number next to it. The way this works is that as noted above, you start a game by revealing a Dragonfire card and applying its effects. But your Dragonfire level is zero. However, at the end of one round of play, after all players have taken a turn, the card on top of the Dragonfire Deck is placed into the discard pile. And while that card’s effects are no longer applied, the Dragonfire level is now one. The Party leader then reveals a new Dragonfire card, reads it aloud, applies any effects as appropriate, then places it on top of the Dragonfire Deck. At the end of the second round, it is discarded, and the Dragonfire level is now two. And so on.

I’m sure you can see immediately what I’m referring to from the opening when I mention this is the pressure that keeps the sense of impending doom constantly at your throat and pushes you throughout the game. The longer you take to get through the Adventure, the more harrowing and difficult it becomes. Take too long and the dangers simply become so great that all your vaunted adventuring skills likely won’t save you.

Goblin Uprising is probably one of the best examples of a Dragonfire card that can rotate from being annoying but fun (ish) at the low end to harrowingly deadly at the high end, depending upon when it shows up.

Now for those that played Shadowrun: Crossfire, we found that while it’s a keystone of the game, it can often be forgotten in the heat of battle as monsters are slain and loot is shared. Based upon player feedback from that game, as well as our playtesting and brainstorming for Dragonfire, we’ve come up with a series of great tricks that will be included directly in the rulebook. We’ve found if you incorporate these into your play, you never forget about the Dragonfire Deck or the active cards.

Excerpt From Rulebook:

  • When determining the Party leader, make sure that player knows it will be their responsibility to keep track of the Dragonfire cards throughout the entire game. Each time a player’s turn starts, the Party leader should do a quick review of the current Dragonfire card to ensure that the new player is abiding by its rules.
  • The Party leader should be the character with the most HP (usually a Martial Class). The order around the table can matter. A good rule of thumb: characters with the most HP should be near the start of a round; characters with the least HP should be near the end of the round.
  • The Dragonfire token is intended to help players remember to turn up a new Dragonfire card when it’s time. We suggest that the Party leader place the Dragonfire token on top of their hand of cards, after completing their turn. That way, when it’s time for that player to take their next turn, they will notice the token when they reach for their cards and remember to deal with the Dragonfire deck first.
  • Place the current Dragonfire card on top of the deck after reading it. That way it’s never confused with the Dragonfire discard pile, which represents the Dragonfire level.
  • Arrange the cards in the Dragonfire discard pile so that the number of cards can be easily counted at a glance to determine the Dragonfire level.

Until next time!

Randall

More Grinding The Blade

Saving Throws. Skill Checks. It would be hard to argue against the idea that these are as quintessential to D&D as fighters, clerics, dragons, and drow. In fact, if you remember the very first dev post, I discussed our lists of essential elements, and those were on most of them.

Yet two and a half months into the core design, neither one had appeared. This was absolutely one of those times when we couldn’t see the forest for the trees, and took a day or three to sit back, re-orient, and determine if the blade grinding was proceeding in the right direction.

And it was not.

After determining that Saving Throws and Skill Checks weren’t there and realizing they needed to be, it took a few days to figure out how to implement them. Loren sparked upon the idea of revealing the top card of the appropriate deck (more on this below). This led to many discussions about that probabilities of success vs. failure; should you replace/bury/discard the card; and even when you’re removing that perfect card you were waiting for, does it still feel satisfying, or just annoying; and so on. A lot of playtesting answered most of those questions.

There was also a question that arose related to the naming convention. Through the first half dozen drafts of the rules and playtesting, the term “Saving Throw” was kept. After all, that’s the D&D term we all know and love. However, as we started to expand playtesting boundaries, we started to receive feedback that it was actually creating a conceptual disconnect. Even for those without a deep knowledge of D&D, the “Throw” aspect simply brought visions of dice. As such, we finally made the call that you always have to make in such situations, and that is to harken to the aesthetics of this game, and modify it slightly from the original RPG source. Hence “Saving Throw” became: Save.

Ultimately, this all led to the same basic mechanic, with Skill Checks only ever applying to characters and Saves only ever applying to Encounters. In both instances, the mechanic plays as follows. First, remember that the entire game is color-coded to four colors: Arcane (blue), Deception (red), Devotion (green) and Martial (black). If you look through the previous blogs (especially Grinding The Blade), you’ll note that all of the encounters and cards fall into one of those four Class Type colors. Second, you reveal the top card of the appropriate deck: if it’s a Save, it’s against an encounter, and you reveal a card from its corresponding encounter deck; if it’s a Skill Check for you, you reveal the top card of your draw deck. If the revealed card’s color matches the color of the encounter—for Saves—or the Character screen—for characters, it’s a success. If it doesn’t, it’s a failure. In both instances the card is then buried to the bottom of its appropriate deck.


Let’s take a look at the two primary ways that Skill Checks occur: either a card requires you to do it, or you play a card that requests it.

For the first option, review the Stone Golem card, arguably the most dangerous card in the Dungeon Difficulty 2 Deck. You’ll note the card requires Skill Checks (in this case, two of them), and then defines what occurs under Failures (i.e. if the cards you reveal do not match your Character screen color (your Class Type)).


For the second option, take a look at Spirit Guardians. This is an instance where the player determines if they wish to make the check or not. Of course, since there is no downside here, there’s no reason not to. However, you’ll note that the card doesn’t say “Skill Check,” but instead says “Devotion Check.” Meaning to succeed at this check you must reveal a green (Devotion) card. Relatively easy for a Devotion character, but for anyone else, much more difficult. This Character Class specific rule takes this great mechanic and allows us to spiral down into targeted flavor depths for various cards. In this instance, this is absolutely a Devotion style of card, and so only a Devotion character should get the maximum effect. (Then again, I’ve seen a non-Devotion player snag the extra bonus…fate was simply kind that day.)

If the added mechanic wasn’t is enjoyable enough, an additional unintended consequence of this design is that the decks create their own proficiencies. By that I mean that in the D&D tabletop RPG, you often can do a lot of things outside of your Class, you’re just not proficient in them, and so it’s harder to achieve a success.

Because a deckbuilding games requires that most players are able to purchase most cards, there’s a slight disconnect built into the game from what you might expect coming from the RPG. (“What do you mean the wizard can buy the Tower Shield?!”) But by introducing Skill Checks, we’re able to temper that Design imperative with a Creative layer. Sure, you can buy off color as needed, but you’re decreasing your proficiencies; your ability to succeed at Skill Checks goes down as you buy off color. Now that seems a bad thing…and it can be. But Skill Checks are not made all the time, and there are great tactical reasons to buy off color (though some of you will quickly decide that your flavor of play means you never buy off color). Just know that like all great games, there’s a price to pay for all such decisions.

The other side of the Skill Check is the Save. Again, there’s multiple ways this can play out. The first are Market card abilities, such as the one for Crown of Confusion, which allow you to target encounters for great effects. Most of the time, an encounter will fail (roughly three out of four times)…but when it doesn’t, it’s a wonderful surprise you have to overcome.

The other option is usually found directly on the encounter, and is often all about bringing the tabletop RPG flavor of a given monster into the game. For example, Invisible Stalker is a hunter/killer that’s summoned and launched at a target and when it’s done, it leaves. The card’s text mechanics embrace the Save as a way to imbue that flavor into the card, while simultaneously giving players those moments of “please go away, please go away!”

These two mechanics work hand in hand to bring some great D&D aspects to Dragonfire, while ensuring that they also spark tactical decisions for the players to embrace and explore as well.

Until next time!

Randall

Grinding The Blade


After a few important side trips, we’re back to discussing the development of the encounter cards.

With the overall shape locked in and graphics well underway, it was time to start grinding to really hone the final shape and start to bring out the shine of the blade.

I’ve mentioned (and shown) several new and/or tweaked elements that we’ve introduced in Dragonfire. There’s so many that I won’t be able to cover them all in a single post, but we’ll dive in and see how far I make it.


The first and easiest was something we attempted in Crossfire, but ultimately it didn’t come to fruition. And that was the idea of using double icons in a level. If you look at the Cyclops, you’ll see it has a double red (Deception) icon on the second level of its damage track. When applying damage to an encounter, you’re going to be playing various cards (like Stealth). And each of those cards will generate certain damage icons. In the instance of the Stealth card, it generates a red (Deception) icon. When you look at the Cyclops, you start at the top and you must apply enough damage, in the appropriate icons, to defeat that level in one turn. In this instance, any three colors. So playing just the Stealth won’t do anything.


However, if I also played a Expertise, that would give me three total icons, which I could then apply to that colorless 3 on the top row of the Cyclops’ damage track to defeat that level (any of the colors can be applied to those type of damage track levels). (I would also choose whether to use Expertise‘ text ability, or not, at my discretion.) However, I then have a double red level on the next row, which means only two red (Deception) icons applied in the same turn can be used to defeat it.


As such, if someone had an appropriate Assist card, which can be played by another player on my turn, then we can do some real damage. Let’s say another player had a Javelin. You’ll note the Javelin Assist ability generates a black (Martial) icon, as well as one colorless damage. So I can take both of those icons, along with my Stealth to generate three icons and defeat the first level, then apply the Expertise double red (Deception) icons to defeat the next level, leaving only two last levels to fully defeat the Cyclops!

Not every card has a double icon, but they serve the function of making it a little more difficult to defeat an encounter, while also first appearing in Difficulty 2 Decks. That provides further flavor and game-play, as well as letting you know you’re facing butcher monsters. (Yes, that means Difficulty 3 Decks will have encounters with three icons on a damage track level!)

Now that was a fun, but subtle tweak from the existing Crossfire engine. Now we’ll move to something completely new: the Tripwire Trait. This was actually an idea that Loren first put forth. I’d also been thinking along these lines, but hadn’t found the right implementation yet, so it was a perfect fit.


As you look through the Monster Manual, you see a wide variety of special traits that bring additional options and powers to a given monster. We try and emulate a hint of that through the various color icons along the damage track. And yes, there’s text effects on cards that bring that same unique feel to the game. However, the Tripwire Trait not only brings that additional Creative aspect—which is important—but also introduces tactical decisions in a far superior way than just a text effect.

Interestingly enough, the Tripwire Trait was one of the elements we argued about more than just about anything else. The main concern being its added complexity. And while it’s a great complexity, it’s still complexity. Should we hold off, and not include it in the base game, and make it an expansion instead? We went round and round on it, but ultimately decided it was simply too good to not have in the base game. As such, we made some good compromises in that it’s only on a certain selection of cards and doesn’t appear on any encounter in Dungeon Difficulty 1 Deck, which is what you’ll play through in your first quick-start game. In other words, you’ll have a game or three under your belt before you’ll run into this feature for the first time, making it easier to roll into your expanding Dragonfire knowledge.

Take a look at the three cards here with Tripwire Traits (white lines in their damage track that correspond to various keyword Tripwire Traits at the bottom of each card). In this instance, Weakness on the Green Slaad, Escape on the Green Hag, and Strength on the Banshee.

The rules for Tripwire is that if you damage a level below the white line, that ability is immediately activated (as appropriate for the type of ability and where you’re at in your turn). Which means the Banshee moves from an Attack Strength of 2 to 3, which is brutal. You then have Weakness on the Green Slaad, which is actually good for you. That usually means, tactically speaking, you want to hit the Green Slaad first and get him weakened; though the three green (Devotion) icons you have to get through can be tough. Whereas you usually want to hold off as long as you can before enraging the Banshee (especially as the track after the trait is relatively light, so if you can make it all in one go, you should try). Not that you always have a choice, mind you…sometimes you just have to get the damage going, and hope the player can take the hit for a round or two.

Then you’ve got the Escape on the Green Hag. If you defeat the Hag all in one go, once you’re past the line, she doesn’t Escape (that happens after the phase in which you deal damage). But if not, she’s going to lose all her damage and escape. Which can be super annoying. At the same time, it can be tactically advantageous. She hits pretty hard and if you really need to be dealing with other cards on the table, sometimes assigning just enough damage to make her go away is the right decision. Just last week we were playtesting an Adventure Level 5 game that included four Scenes of play (as opposed to the usual three Scenes), and the Green Hag showed up Scene one. And for the next three Scenes, though annoying, we simply found it better to make her go away and concentrate elsewhere. But she just kept popping up in the next Scene as soon as new encounter cards were revealed. We finally got her on the final Scene.

Of all the new additions to the game, the Tripwire Trait is one of our favorites for both the wonderful D&D flavor it brings to the table, as well as the great decisions player have to make to try and solve the puzzle to complete the Adventure.

Until next time!

Randall

Rethinking Parts of the Blade

Any game you work on is a labor of love. Even if you start out indifferent to it, if you’re going to put in the long hours and find the good creative spark to make a great game, you have to find that love for what you’re working on.

At the same time, you can’t lose sight of the fact that once you release the game, it’s no longer your baby. The community will take that hard-forged blade you spent countless hours beating into shape, and make it their own in whatever way they want. And that’s how it should be.

However, thanks to the nature of online communities, you can often get a good sense of what the community wants from your game well before it heads to print—and it may not be what you originally intended. Then you’re left with a decision of whether you should or shouldn’t listen to the community. I tend to side on ‘listen to the community’ whenever possible.

So when we released the first details surrounding Dragonfire, we immediately got a response we did not remotely expect: “We want 2-player!” And it wasn’t a little response, either; it was a significant one, entailing requests via emails, Facebook, Twitter and more.

The idea of the 2-player popped up on our radar early, but we had initially discarded it for several reasons.

First, this is a cooperative game, and two-player cooperative games are generally not very good.

Second, as previously mentioned, there had been so much call for Shadowrun: Crossfire to have a 5- and 6-player option, we knew Dragonfire must include that expanded play, and so all our time and efforts regarding the number of players were focused on the larger side.

Finally, the nature of the Crossfire engine means that more players in the game make it easier to play, and fewer players make it harder. Which means that the 2-player vs. 6-player concepts are diametrically opposed. While working on the one, it seemed unnecessary to work on the other.

However, the community let us know instantly—and loudly—that they wanted a different blade. And after a quick discussion, we realized that this isn’t just our love…this will hopefully be all your love as well. As such, we’ve spent the last month continuing to figure out how the 5- and 6-player will work while figuring out the 2-player aspect.

We easily playtested at least a dozen different ways to make all of that work, and it was messy. Very messy. Again, remember that these two player concepts are opposed to each other, so the various elements you try on one almost always break the other.

Additionally, it’s a matter of a design space. As you can see on the Character screen (prefinal) above, there are 4 stats that make up your character: starting hand, starting gold, starting HP, and your Equipment Pack (the icons indicate the combination of Basic Market cards that become your draw deck during the game). And the nuances between Character screens can be as simple as one or two subtle stat changes, as you can see below (again, pre-final screen).

That may not seem like much on the surface, but believe me, the changes make for very different play. And we already determined during the building of the character stats that pushing them too far outside their parameters breaks the game. So trying to add or subtract from each of those, based upon the number of players…yeah…we tried every iteration we could think of, and none of them worked well at all.

We also explored the idea of messing with the Dragonfire level based upon the number of players, as well as revealing additional encounters (the monster/NPC cards you need to defeat in a given Scene of an Adventure). Both of those had limited success, but brought other problems that made it messy.

As universal rules, none of the above worked. What’s more, it felt completely wrong to tell a group of players that you can open your brand new game, grab your brand new Character screen, and then ignore the printed data on the screen for your starting hand/gold/HP, based upon the number of players.

We then started to break the concepts down into parts and apply them selectively. That started to gel well for the 5- and 6-player games, where the idea of adding additional encounters lead to the final, following rules at left (pre-final except from the rulebook):

As the top-end of the game solidified, that left the 2-player floundering. Until that wonderful epiphany moment. All of the Market cards in Dragonfire have their place, and can be pivotal during a game. But any card game has a few loadbearing cards, where the game would literally stop functioning well if they were removed. One of those is Bless.

Many, many discussions revolved around whether Bless might be too good, but ultimately it’s a pillar of the game. And the epiphany came with the idea of substituting out a Basic Market card for a Bless for the 2-player game when building the Equipment Pack (thanks, Jay!). We immediately dove into playing it, and it instantly clicked with a rule we’d already implanted in lowering the Dragonfire level. In fact, it worked so well that we threw away some of the rules we’d developed for the 3-player and folded that into the same concept. Which lead to the following rule, below (again, pre-final excerpt from the rulebook):

Now I know what you might be thinking. “Wait, you said you didn’t like changing the printed stats for the number of players, but that’s exactly what you’re doing. Changing the Equipment Pack.” And you’re right. However, it felt good. Unlike the other stats, which are just values, and having to remember to add or subtract one from a number was often just annoying, adding in a more powerful card felt great. What’s more, as soon as you have even one game under your belt, you start to understand how the various colors work. And you immediately get a fun little build-your-deck decision to make before the game starts on which Basic card to trade out for the Bless, based upon which primary Class Types are represented (Arcane, Devotion, Deception, Martial), the Character screens you’ve selected (i.e. the Character Class and race), and so on.

Ultimately that’s one of the most satisfying aspects of game design and development. When you’ve banged your head against the wall for a long time, and suddenly the solution appears and it not only works, it works very well. After we first decided to work on 2-player rules, I remember saying something akin to: “I’ll never play 2-player, but if others want it, then let’s figure it out.” Since then, I’ve played dozens of two-player games, including four of them last night at Adventure Levels 4 and 5 (will dive into what exactly that means in a future post) and each one was an absolute blast. As I said…it works, and it works very well.

We are, then, officially announcing that Dragonfire is a “2 to 6 player cooperative deckbuilding game.” (We’ve changed the website details to reflect that.) Thanks to you, the community, for letting us know the type of blade you want, and forcing us to re-think that part of the design. Dragonfire is far better and more versatile because of it!

Until next time!

Randall

Working From The Original Blade


Since launching our countdown to the release of Dragonfire, we’ve had a lot of people asking about Shadowrun: Crossfire. That’s the original game where the Crossfire engine was first published. All of the dev blogs you’re reading are about how we’re taking that brilliant engine and modifying and/or expanding it to fit Dragonfire. So of course, our game couldn’t exist without that amazing original game design.


For example, take a look at the Shadowrun: Crossfire Elf Freelancer obstacle. Then compare that to the Dragonfire Green Slaad encounter. You’ll notice a ton of similarities, even if the graphics are completely re-worked. You’ll even notice that the Elf Freelancer has a Crossfire level effect (the 3 in the crosshairs) and the Green Slaad also has two Dragonfire level effects (the 5+ and 7+ with the dragonhead). All very similar. However, on the Green Slaad you’ll notice several elements not found on the Elf Freelancer (nor anywhere in Shadowrun: Crossfire); new mechanics we’ve introduced that help to make the game fresh and distinct. The first is the double green icon along the right-side damage track. The second is the Summon ability. Finally, the Tripwire Trait; the Weakness keyword at the bottom of the card, and the corresponding white line in the damage track. Just three highlights of the many tweaks and additions in Dragonfire. (As previously mentioned, I’ll dive into the specifics of the Tripwire Trait in future posts.)

With all of that in mind, I thought I’d shine a light on the luminaries involved in creating it, and their amazing breadth of work that covers almost every aspect of our hobby.

Here’s the original Crossfire team’s bios:

Gregory Marques
Gregory brings his experience as a game designer and product developer to every new project with a fiery passion. Before taking on the role of lead game designer on Shadowrun: Crossfire, Gregory was the lead designer and lead writer for the critically acclaimed Facebook game Dungeons and Dragons: Tiny Adventures and a designer on multiple expansions to Magic: The Gathering, Duel Masters, and Heralds of Chaos. Currently, Gregory is Lead Systems Designer at Amazon Game Studios.

Michael Elliott
Mike Elliott is a veteran game designer with over 20 years experience in the field. He started his career at Wizards of the Coast, where he worked doing design and development on about 30 Magic: The Gathering expansions and worked on numerous other game lines, including the mega-hit Pokémon trading card game. Mike later worked at WizKids Games as senior designer, and worked on a number of popular miniatures product lines.

He now has his own design company, which has done design and consulting work for companies including Hasbro, Activision, Topps, and Bandai, among others. In addition to doing design work for existing brands such as Magic: The Gathering and HeroClix, Mike has had over 50 of his own game designs published. He has done extensive work in the trading card game field, with around 20 published trading card games. Two of his original designs, Duel Masters and Battle Spirits, are among the bestselling trading card games in the Japan market. Mike also designed the Cardjitsu game for the Disney Club Penguin website.

Mike has published patents for toys and casino games, and has worked in the areas of trading card games, computer games, miniatures games, and board games. Some of Mike’s published products include the Thunderstone, Quarriors, and Dice Masters game lines.

Twitter: @Elliott_games

Rob Heinsoo
Rob Heinsoo designs games. Having created dozens of role-playing games, card games, miniatures games and board games, he led the design of the fourth edition of Dungeons & Dragons, and wrote or led the design of many 4e D&D sourcebooks. Along with Jonathan Tweet, Rob is the co-designer and current Line Editor of the ENnie award winning RPG 13th Age from Pelgrane Press.

In addition to Shadowrun: Crossfire, other game designs include Legendary: Big Trouble in Little China, Epic Spell Wars of the Battle Wizards: Duel at Mt. Skullzfyre, True Blood: Night Eternal, Three-Dragon Ante, Three-Dragon Ante: Emperor’s Gambit, Inn-Fighting, Dreamblade, the Football Champions TCG, the Shadowfist set Flashpoint, King of Dragon Pass, and the first nine sets of D&D Miniatures.

http://robheinsoo.blogspot.com/

James “Jim” Lin
James Lin worked at Wizards of the Coast from 1993-2002. He was one of the initial designers working with Richard Garfield on the creation of Magic: The Gathering, and was involved in design and development of all Magic: The Gathering sets through Alliances. Starting in 1995, he led design and development efforts at Wizards for all trading card games other than Magic. In this role, he served on an advisory council guiding product launches and strategies, and played a key role in developing Wizards’ strategy for its launch of the Pokémon trading card game. Starting in 1999, James became the Senior VP of R&D at Wizards with responsibility for design and development work on all Wizards’ products, and served on an advisory council guiding all product strategies and launches within WOTC.

James led “Phase II Design” (Game Development) on Shadowrun: Crossfire. He’s currently working with The Pokémon Company International.

Rob Watkins
Former Magic: The Gathering Pro Tour player and champion of Dungeons & Dragons, Rob Watkins is an award-winning game designer of board games, card games, computer games, miniatures games, and roleplaying games. Games he’s worked on include Dreamblade, Duel For the Stars (precursor to Race For the Galaxy), Dungeons & Dragons 3.5 and 4th Editions, Dungeons & Dragons Miniatures, Neopets Trading Card Game, Odyssey, Star Wars Miniatures, and Throne World.

Most recently, Rob has been working on Plants vs. Zombies: Heroes.

Sean McCarthy
After graduating early from the University of Washington Computer Science program, Sean was immediately hired by Google. He learned everything there was to learn there, then set out on an adventure to make games. Shadowrun: Crossfire was his first major title, currently Sean is a game designer with PopCap Games on Plants vs. Zombies: Heroes.

SPECIAL MENTIONS

Cal Moore
Cal worked at Wizards of the Coast from 2000–2011 as a technical editor and writer. While there, he worked on TCGs like Duelmasters, the Showdown Sports line, GI Joe, Kids Next Door, Xiaolin Showdown, Maplestory, and Uzumajin, RPG products for D&D 4th Edition like The Plane Above, Monster Vault: Nentir Vale, Mordenkainen’s Magnificent Emporium, Tomb of Horrors, and Gamma World, and other games like Dreamblade, Axis & Allies Miniatures, Axis & Allies, Risk Godstorm, Castle Ravenloft, and many more.

Cal was the original editor for Shadowrun: Crossfire. He’s also been helping Rob Heinsoo wrangle 13th Age RPG content into shape, and provides templating and technical editing for several digital games currently in production.

Conan Chamberlain
Conan has been involved in games quality assurance since 1994, and has worked on more than 50 published titles, including: Chrono Trigger, Breath of Fire, Tribes: Vengeance, Motor City Online, Deer Hunt Challenge, Championship Bass, Matrix Online, Empire Earth II, Tron: Evolution, Toy Story 3, Split Second, The Hobbit, FIFA 2001 MLS, Lumines II, Pirates of the Caribbean 1, 2 & 3, Narnia, Pure, Turok, and many others.

Conan provided quality assurance and extensive playtesting on Shadowrun: Crossfire. He is now working at EA/Popcap Games.

Jay Schneider
Professional chess player, wearable computing researcher, soldier, EMT, CEO, Jay has spent his life as he was destined to live it…going in several directions at once. Games have been a unifying thread throughout his life, and he’s best known as the designer of the mana curve and the Sligh deck for Magic: The Gathering.

Jay’s top credit is as a designer and game producer of Magic: The Gathering: Duels of the Planeswalkers. Other major credits include executive producer of the 13th Age RPG line and game producer for Heralds of Chaos. Currently Jay is Operations Manager for Fire Opal Media and teaches Game Design at the University of Washington.

Jay was the design producer on Shadowrun: Crossfire and is the design consultant for Dragonfire.

https://www.pce.uw.edu/instructors/jay-schneider

Until next time!

Randall

Annealing: The Slow Cooldown

During the forging of a blade, you will reach the annealing stage. This is when you’ve got the final shape desired, and then the blade is heated and then cooled very slowly.


A large card game—or any large tabletop game for that matter—is often very different from a book at this stage. It’s my experience that for a book, you usually finish the entire thing first and then turn the complete manuscript over to layout. It’s then laid out and turned back over to design to review for a last proofing stage.


With a game like this, however, once you reach a certain level of the design—with a ton of work still left, mind you—you turn the material in hand over to graphic design. This includes all the notes you’ve generated to date about the graphic interface the cards need to embrace for the rules and the game play experience. For example where the gold should appear; how the damage track should look; presentation of any text rules; and so on. Then graphics opens up their can of awesome-sauce tools to start making all the scribbles from design look stunning on a card. Often this creates a cooldown period, where design is off working on other elements while graphics works its magic. Then you re-wed any final design/playtesting elements onto the tail end of the graphics side.


With a game like this, however, once you reach a certain level of the design—with a ton of work still left, mind you—you turn the material in hand over to graphic design. This includes all the notes you’ve generated to date about the graphic interface the cards need to embrace for the rules and the game play experience. For example where the gold should appear; how the damage track should look; presentation of any text rules; and so on. Then graphics opens up their can of awesome-sauce tools to start making all the scribbles from design look stunning on a card. Often this creates a cooldown period, where design is off working on other elements while graphics works its magic. Then you re-wed any final design/playtesting elements onto the tail end of the graphics side.


Unfortunately with Dragonfire, the scope and schedule of the project didn’t allow for that usual cooldown period. And so Matt Heerdt—lead graphics guru for Dragonfire—had to not only deal with the creating the overall graphic design for close to a dozen different card types, but work around design constantly fiddling with the initial sets of data we provided. This created a moving target that made things much more complex across the board. And I’m sure Matt had moments when he wanted to tear off my arm and beat me with it. (Luckily, he didn’t.) Simply the nature of the beast this time around.


Just as game design can be a really long process, graphic design can be just as brutal. There are a few blessed times, however, when a graphic comes in and it’s 99% there from the start. That happened with the front of the Dragonfire box. But for every card in the game, we went through a half-dozen to a dozen iterations of graphic design. And when it came to the encounters—the stars of Dragonfire, so to speak—it may have reached well past thirty iterations (you can see a selection of those within this post showing a handful of different paths we attempted); there were just so many factors to take into account. 
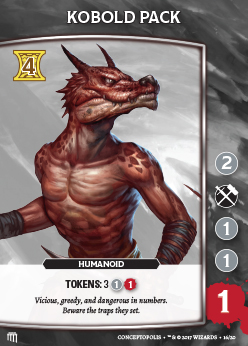
And not just our own design versions—both for the aesthetics we wanted and for the needs of the game play experience—but incorporating input from Wizards of the Coast as well. After all, this is a licensed property, with a wonderfully established aesthetic in Dungeon & Dragons Fifth Edition. So we needed to match up with their requirements as well. Like I said earlier, a lot of moving targets.

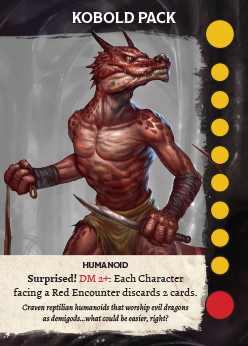
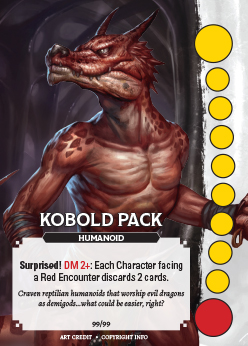
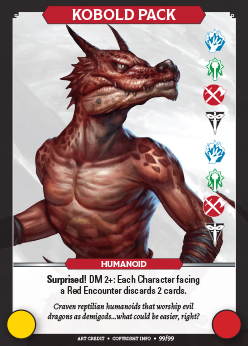
So many iterations, so many meetings… I remember one where we had pages and pages of twenty-plus iterations spread all over the table, and spent several hours just discussing details. This included pulling out fifteen or so published games and laying out cards from each one on the table. Not to copy anything, of course, but to simply see what worked in other games. And what didn’t. And more importantly, could we pinpoint the whys of both those situations and attempt to address them in our new design. This sometimes led to passionate arguments over X or Y elements on a card, and why it worked in one person’s opinion, and didn’t according to another person. However, as in most things, we finally were able to reach a graphic design that everyone signed off on (the final Kobold Pack card in this post).


Since you saw all of the iterations of the playtesting for the roper, here’s also the final card for that…as well as two more of my personal favorites in the Cloaker and the Moaning Chamber (primarily for D&D flavor brought out so well in the game play).

For those that previously played Shadowrun: Crossfire, you’ll notice several new elements found on these cards. For example, Location cards, Skill Checks, Tripwire Traits (the “Terror” on the Moaning Chamber), and tokens. All wonderful fodder for future posts.

Until next time!

Randall

Hammering Into Shape


A thousand fantasy books have filled our minds with the quintessential image of the blacksmith: a dark, cavernous room lit only by a devilishly-glowing forge; the steady, rhythmic cacophony of steel on steel; the giant-of-a-man with arms the size of small trees hammering a bar of red-hot metal until a beautiful blade emerges from the other side…at least, the blacksmith pouring all his skill and strength into the crafting sure hopes it’s a quality blade. After all, even the finest bladesmiths can produce a bad blade, with an unknown defect ruining all their work.

Game design reaches a place that’s shockingly similar to those images. Including often being alone for hours at the devilishly-lit forge of a computer screen until the witching hour. Not to mention the needed stamina to keep pounding at a design over and over as you strip out the impurities.

Playtesting: the hammer and anvil for any game. As I mentioned in my last post, no amount of beautiful math and comprehensive spreadsheets will ever fully take the place of playtesting. It simply has to be done, so you have to find a way to be okay with the endless games.


I know what some of you may be thinking: “You’re complaining about playing a game?!” Not complaining. Not that. I’m very humbled to be able to design games for a living. Yet there is a world of different between playing a game for enjoyment and playtesting.

Think back to high school or college. Most of you, at some point, wrote a lengthy report on a favorite novel. And depending upon your grade level and your teacher, you may have read the novel multiple times, endlessly dissecting it. Tearing the story into sections, figuring out what worked and why—what didn’t work, what was the story the author tried to convey, what story did you the reader actually receive—the list goes on and on. How many of you have since gone back and actually read that book just for fun? I’m willing to bet for a large chunk of you, the answer is somewhere between zero and never.

The same can be applied here. Yes, we’re playing a game. So it’s great. However, you bring a different concentration to the fore when playtesting. And it means constantly stopping and talking and dissecting. I remember one playtest session where one of the players kept rolling their eyes and getting frustrated and looked to be on the verge of walking out after the tenth or twelfth time something wasn’t working and we’d stopped to discuss it yet again. And this was an industry professional—albeit from the art side—who’d been around a pile of such playtesting.


So imagine say six straight hours where you play a game for an hour, meticulously tracking all of the details of what cards were played, how much gold was rewarded, how many encounters defeated and so on. Then you reset and you play again, tracking all the new data. Then you reset and do it again. And that happens 4 to 6 times within that six hours. Then even after all of the talk during the game, you might spend another hour or two discussing all of those details and trying to generate some actionable items for how to address as many issues as you can. Then either late that day or early the next, you take all of that, generate an email (or Basecamp post) that fully articulates everything learned and discussed so everyone is on the same page. Then you start the process of carefully folding the proposed changes into place and prepping for the next day’s playtest. And depending upon the game, you could do that for months. As we’ve done for Dragonfire.

Speaking of prepping, as some of you may know if you follow the Catalyst Twitter or Instagram or Tumblr, there are days when it feels like I just craft. In fact, due to the large card count in Dragonfire, for some playtest groups I built entire sets to ship them. Multiple times. Lost track of how many binge Netflix sessions late at night of just peeling and placing cards; sleeving and organizing. And that’s just the physical part. Then you had all the time of my quick-and-dirty builds within InDesign to create the cards for playtesting. And then adjusting. And adjusting. Adjusting again. And adjusting some more. I think you get the picture.

Stacks of playing cards from the Dollar Store; reams of Avery labels; gallons of printer ink; boxes and boxes of sleeves from the local game store (thanks Zulu’s!): they’re all a game designer’s best friend during play testing.

For a look at this process, on just one card, take a look at the series of playtest cards that were generated and used across several months (running down the right side of this post). The first version of the gibbering mouther was built with the original design curve I noted in my previous post. And if you compare the first card to the second, you’ll see a radical shift in the hit points on it damage track (how much damage you much apply to defeat the encounter; the colored squares and numbers down the card’s right side) as it was adjusted for the new curves.


After more playtesting, we realized that we’d actually made the card too easy. As previously mentioned, Shadowrun: Crossfire was far too difficult for where we wanted Dragonfire placed, so we moved heavily in the opposite direction. But as often is the case, we’d moved too far on some aspects, and so we had to adjust back the other way. In a given deck, many cards had Attack Strength increases (how much damage they inflict on a character), while others had their damage tracks punched up. In the case of the gibbering mouther, we added a Dragonfire level that would really start to hurt if the game dragged on too long. (The Dragonfire Deck is one of the best and most unique aspects of Dragonfire…I’ll spend a whole future post discussing this great element.)

Next, you’ll see its transition from the gibbering mouther to the roper as the Creative was fully adjusted (again, as discussed in the previous post).


The final image—what was passed to layout for the graphic design of the card—includes two more elements. Once again, that endless hammering and fine-tuning, pulling each Encounter Deck into the difficulty level we needed, came into play yet again. In this case, the 8+ Dragonfire level became a 6+ and 8+, while we added a Dispel Magic Surprise effect (it is applied the moment the card is revealed), which can remove some of your magic items from play. (These additions were both about increasing the strength of the card, but also taking into account the moving part of other design elements that required effective ways for encounters to deal with said magic items.)

Ultimately, I love playtesting. But it can be exhausting, and is always more difficult and time consuming than expected. If you ever get the chance to playtest a game for a company, I urge you to give it a try. It’ll convey a whole new world of respect for the process, much as it did for me back in the early ’90s, when I had my first chance to playtest a scenario pack for BattleTech. If you know anyone that playtests games for various companies, give them a high five or buy them a cookie the next time you see them. They’re a brilliant, passionate, integral part of making the games we love to play.

Until next time!

Randall

Selecting The Proper Metal

I mentioned in my previous post about “deck curves.” And that ultimately I rushed too quickly into the initial design, which meant I had to throw almost everything out and restart. (And that was after building materials and playtesting several times.)

When I say a curve, I’m referring to several things as they apply to an encounter deck:

  • Total hit points
  • Attack Values
  • Gold Pay Out
  • Additional Differentiation (Very Bad, Bad, Neutral, Good, and Very Good)

Each of the Encounter Decks in Dragonfire contains twenty cards. So what do the curves of numbers for each of the data points above look like as they are applied across twenty cards?

Let’s just take one example: the total hit points on a Difficulty 2 Rating Deck. And by this, I mean how much damage must be dealt (regardless of color) to defeat an encounter. My initial build used the following:

This means that two cards have five hit points on them, three cards have six hit points, and so on. Now, there were numerous fundamental problems that arose in this build. In no particular order:

Instead of thoroughly discussing what we wanted the Dragonfire curves to be, I just started out by mirroring the curves in Shadowrun: Crossfire. But those were built with forty card decks in mind, and built with the Shadowrun Creative in mind as well; in other words, constructed so as to evoke the particular elements of that universe that make it cool and unique. After some initial playtests, we realized it wasn’t feeling right, and the biggest reason is that we hadn’t built it to evoke D&D.

The next misstep was more production-oriented. I’d originally imagined that we’d have ten different levels of progressively more difficult decks. And because my game designer hat was more firmly on than my production hat at the time, I didn’t really think through the issues that would arise. Namely, we couldn’t possibly produce enough cards and have enough releases to cover such detailed differentiation. After kicking it around some more, we realized that four progressively more difficult decks would cover ten levels of player experience very well. This would provide a good balance between what players will need and want, and what the game and production can support.

The final misstep came directly out of the previous mistakes (as they always do). While we don’t directly use the Challenge Rating from the tabletop RPG, it informs the selection of monsters that we apply to a given encounter deck. Under the initial idea that we’d have ten levels of encounter decks, I built the Creative—the particular monsters that would appear on each card—so that sixteen of the twenty encounters were Challenge 1, while four of them (the hardest to deal with in that deck) were Challenge 2. Then, per the spreadsheet from the previous post, I filled everything in and fully built playtest materials. Such work ultimately left the gibbering mouther as the hardest card of the Dungeon Difficulty 1 Deck.

However, when you switch to only four decks, it means the breakdown of Challenge Ratings roughly transitions into: Challenge 1-5 = Encounter Difficulty 1; Challenge 6-10 = Encounter Difficulty 2; Challenge 11-15 = Encounter Difficulty 3; Challenge 16-20 = Encounter Difficulty 4. Generally speaking, anything above Challenge 20 will be a special “archenemy” card. Which also means that the hardest cards are now equal to Challenge Rating 5 monsters. So the Creative across all decks had to be completely re-built, and so the gibbering mouther became a roper.

After several weeks of going down wrong tracks—which, in many ways, was still a good thing, as it really let us know where the new focus must be—we addressed all of the issues above. In doing so, we arrived at all new curves of data. For example, now the hit points on an Encounter Difficulty 2 deck look like the following:

Now, to be clear, even though those work 95% of the time, a lot of playtesting fine-tuned several of those elements. So while one tab of the master monster google sheet includes the data for the deck curves, if you compare those curves directly to the final encounter decks tab, you’ll notice small variations here and there. No amount of math and data crunching on a sheet will ever replace the need for just endlessly banging on a game at the table and adjusting appropriately due to such playtesting.

In the next post, I’ll dive into playtesting itself, and how that evolved the encounter design.

Until next time!

Randall

Sketching the Dream

As I delve deeper into the design and creation of Dragonfire, you’re going to see this phrase—“I’ll talk about that in future posts.”—a lot, so I’ll apologize in advance. But when designing a game, particularly one as complex as this one, there are so many interwoven elements that you simply can’t discuss them all at once. Well, I could…but then this blog would be a novella…at least. As such, you’ll see several instances of having to refer to a design element, rule, or feature in a future post. It’s simply the nature of giving you such an in-depth behind-the-scenes look at the entire process.

Right from the start, I knew we’d be making a key departure from Shadowrun: Crossfire. In that game, there are two obstacle decks (encounters), one hard and one easy. And they’re filled with every type of strange obstacle you might encounter in Shadowrun. Because in Shadowrun, well, you can run into almost anything, almost anywhere.

But it doesn’t work that way in Dungeons & Dragons. You’re never going to run into a roper in a city. Or a dryad in a dungeon. Well, let me rephrase that. Sure, a dungeonmaster could make that happen. But it’s going to raise player eyebrows unless there’s a great story behind it. Which there might be. But we don’t have that luxury in a card game. So when a particular monster shows up, it had better appear within an appropriate environment.

A second angle that comes from the Dungeons & Dragons universe is the idea of moving through those various iconic locales. In Shadowrun: Crossfire, there’s generally a sense that you’re in a future megasprawl city and that’s it. And that’s perfect for that setting. But for D&D, you need to feel like you can play games in various locations. From Baldur’s Gate to the Trollclaws to the Sea of Swords to The Spine of the World. These are rich, varied environments, and conveying that through the encounters you face fully embraces that aesthetic.

With all of that in mind, we knew the encounters cards would be broken into various sets: Dungeon, Wilderness, City, and so on. To facilitate that building, I took the tables in the back of the Dungeon Master’s Guide and typed them into a spreadsheet for ease of review and manipulation. While a lot of front end work, it would make all the subsequent work much easier as we decided on a locale for an encounter deck—say, Wilderness—and then select an appropriate environment—say, Forest—and start building the encounter deck.

Once that was done, it was time to start building a full spreadsheet and then filling it in. Below you’ll see the first line in a spreadsheet—broken up into bite sizes to make it digestible in this format—that now contains data for over a hundred cards. Skeletons, of course, seemed the most obvious place to start when building our first Dungeon Deck.

Most of the data above should be pretty self-explanatory, with a few caveats. First, while the D&D Challenge Rating has no direct impact within Dragonfire, it’s still very useful when selecting and translating various monsters to ensure they retain a respective degree of difficulty to each other and the party, based upon that rating.

For the card color, remember that all of Dragonfire is color-coded to four colors. So the capital letters applies to the card color and damage track, while the secondary color applies to what will also appear on the damage track. In this case, creatively, Devotion and Arcane felt most appropriate for Swarming Skeletons.

Finally, yes, there are Location Encounter cards in Dragonfire; I’ll touch on them in the future.

The skeleton ended up being one of the easiest Dungeon Deck encounters—there has to be an easiest—and so it only has two points on the Damage Track (G = green, U = blue (because B = black)).

Additional Differentiation applies to the concept that even after creating the various Hit Point curves for a deck, you need more variety. So there is a specific number of Very Bad, Bad, Neutral, Good and Very Good cards. In this instance, a Swarming Skeleton is a neutral.

The Trait icon is a brand new element for Dragonfire, and I’ll also cover that in a future post.

A whole slew of different text rules can be found in this column of the spreadsheet, including no text rules at all on a card. In this instance, tokens are a brand-new mechanic for Dragonfire.

While playtesting the first few builds of the game, we realized that a key flavor of D&D was missing (if you recall, I discussed those lists of key aesthetics last week): the idea of swarming monsters. Dragonfire is a deckbuilding game, so it already has a huge number of cards. And even with that, we were still lacking that feeling of swarming monsters. So we came up with the idea of tokens—punch-out playing pieces you can place next to the card—as a way to bring that all-important element into play. It’s one of my favorite new elements we introduced. It not only plays wonderfully at the table, but it provides a lot of Creative/Design space as well. (The 6+ and 8+ refer to the Dragonfire level; I’ll touch on that in future posts.)

Next is flavor text. Gotta have a quick dash of flavor for some nice immersion. Not surprisingly, there were several good discussions over the tone and direction of each flavor text. I won some, I lost some, just like any work amongst a group of creatives.

Now someone has to dig the specific illustration file name out of the D&D archive. And it’s a BIG archive. Never have I been so appreciative of a Mac’s robust previewing option to simply scroll through hundreds of large files to find what I need without actually opening anything. And that work is crucial in making layout flowing quicker. Finally, at a great suggestion from WotC, we’re including the artist’s name on every card.

Rinse and repeat…over a hundred times, just for the encounters in the base box. And of course, significant playtesting and discussions resulted in the spreadsheet being re-built and re-tweaked dozens of times.

In my entry, I’ll discuss how, despite all of the pre-meetings we had, I still managed to move a little too fast in building the encounter decks data, and ultimately had to rebuild almost the entire sheet—not including those playtesting tweaks noted above—to better address the appropriate design curves (and the subsequent re-figuring of the creative aspect that went along with it).

Until next time!

Randall